Multi-Angle adds AI-generated shots to your podcast, interview, or talking-head recording while keeping the original audio. Upload one video, choose how much extra coverage you want, review the planned moments, then render, refine, and download your edit.

Supported inputs and limits

  • File types: MP4, MOV, and WebM.
  • File size: up to 4 GB.
  • Recording length: up to 1 hour.
  • Recommended footage: continuous single-camera recordings with clear faces and a relatively stable scene.
  • Generated-shot quality: 480p or 720p.
  • Shot coverage: Fewer, Balanced, or More. These are not fixed shot counts.

How to use Multi-Angle

Upload your recording

  1. Open Multi-Angle and sign in with your OpusClip account.
  2. Select Upload a source video and choose your recording.
  3. Keep the page open while the source uploads and is prepared. When preparation finishes, your video opens in the editor.

Choose coverage and create a plan

  1. In Part of the video, keep the full recording or select a section. Drag the range handles or enter the Start and End times in seconds.
  2. Under Shot coverage, choose Fewer for key moments, Balanced for a natural pace, or More for more frequent extra shots.
  3. Select Create shot plan. The editor shows the proposed moments and their time ranges. Planning does not start paid video rendering.
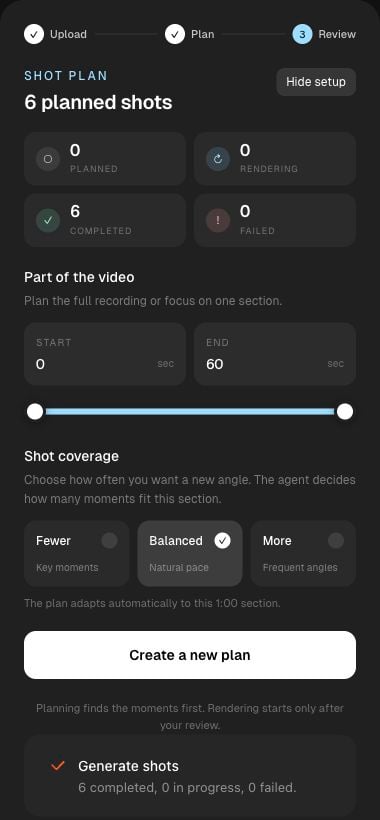
The Multi-Angle editor with Part of the video, Shot coverage, and Create shot plan controls.

Choose the video section and coverage. In an existing project, Edit setup opens these controls and the planning button reads Create a new plan.

Review the planned moments

  1. Select a shot in Planned moments or on the timeline to inspect its timing and the reason it was selected.
  2. Drag either edge of its timeline tile to shorten the shot within its original window. You cannot move the entire tile to an unrelated moment or extend it beyond the available window.
  3. To add coverage elsewhere, seek to that moment and select + Add shot. If the position overlaps another shot, the button may offer a nearby available gap.
  4. Use Delete to remove a moment you do not want.
To change the overall setup, select Edit setup, adjust the section or coverage, and select Create a new plan. Read the replacement confirmation before continuing: planner-created shots are replaced, manually added shots stay, and previous render charges are not refunded.

Render the shots

  1. Choose Render quality: 480p or 720p.
  2. Review the credit amount displayed on the render button. The amount can change with shot duration, quality, and the current discount.
  3. Select Render [number] shots to start the planned batch, or open a planned shot and select Render shot to render it individually. Clicking the priced button confirms the paid action.
  4. Follow the shot statuses while rendering runs. A shot waiting in the queue is not necessarily failed. Completed shots remain available even if another shot fails.

Review and refine the results

  1. Play the main video to review the edit with the original audio. Open an individual shot to inspect the actual Generated shot.
  2. Turn off Show this shot to use the source footage at that moment instead. This changes the main edit; the individual Generated shot preview still shows the generated result.
  3. Drag the shot’s timeline edges to shorten it. After rendering, trimming is limited to the footage that was generated.
  4. If you want a different result, enable Show this shot, review the new credit amount, and select Regenerate shot. Regeneration is a new paid render, not a free revision.
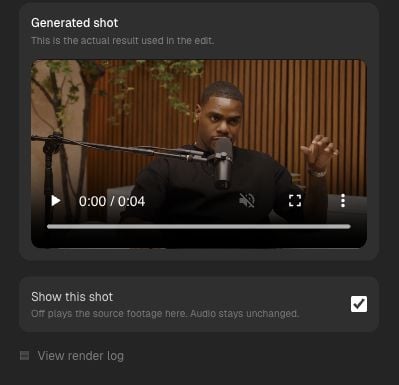
An individual generated shot with Show this shot and Regenerate shot controls.

Review the actual generated video. Show this shot controls whether the main edit uses this result or the original footage.

Download your edit

  1. Review your final shot selection and trims.
  2. Select Download. The button changes to Preparing download… while the current edit is assembled.
  3. Wait for the download to finish, then watch the MP4 with sound. If you change the edit afterward, download again to get the updated version.

Find your projects

Select Projects to return to Your projects, then open a saved project to continue reviewing or editing. A project link does not grant access to someone else’s account; use the OpusClip account and organization that own the project. Sources and generated outputs expire 30 days after the initial upload. Opening a project or rendering more shots does not extend that period. Download the edits you want to keep before expiry.

Credits

Multi-Angle and OpusClip use the same credit balance. Uploading, planning, reviewing, trimming, and downloading do not have a separate customer credit charge. Paid video rendering shows its current credit amount before you start.
  • When rendering starts: the displayed amount is reserved. Credits are charged as each shot completes.
  • Completed shots: charged even if you hide or delete them, or decide the result is not useful. Quality dissatisfaction does not automatically refund a completed render.
  • Technical failures: reserved credits for definitively failed renders are released. If the outcome is still being checked, the reservation may remain until it is resolved.
  • Automatic recovery: continues the existing attempt without an additional render charge.
  • Regenerate shot or an explicit paid retry: a new attempt with a new displayed price.
If your balance is insufficient, your plan stays saved. Return when you have enough credits, or choose fewer shots or a lower render quality and review the updated price.

Troubleshooting

The upload is rejected or preparation fails

Check that the video is a playable MP4, MOV, or WebM within the 4 GB and 1-hour limits. Keep the upload page open and check your connection. If the app offers Choose another video, choose a supported source and try again. If preparation repeatedly fails, contact support with the project link and the displayed error.

Planning fails

Check the displayed error and confirm the selected section is at least 8 seconds long. If the app is reconnecting or work is already running, wait for its status to update before retrying. Contact support if the problem continues.

Some shots fail

Open each failed shot to read its error and credit status. You can review the completed shots separately. Use Retry shot only when it is available and you have reviewed the displayed price. If the message asks you to change the source or shot, make that correction instead of repeating the same request.

The render start was not confirmed

Select Refresh shot status before trying again: the original attempt may already be running. If the shot or credit status says recovery is required, do not start another render to replace it. Contact support with the project link so the existing attempt can be checked.

The result looks too similar to the source, or the person or background changes

AI-generated shots can change facial detail, lighting, background, or motion, and the new viewpoint may be subtle. Turn off Show this shot to keep the original footage, or try a new paid regeneration. Review results yourself; no exact angle or guaranteed improvement is promised.

Turning off Show this shot does not change the small preview

This is expected. The checkbox controls the main edit, not the individual Generated shot preview. Close the shot panel and play the main video at that moment to compare. If the main player still shows the disabled result after the update finishes, refresh the project and contact support if it persists.

A download fails

Your edit stays saved. Check the displayed message, reopen the project, and try Download again when no rendering or other editing action is in progress. Do not render the shots again just to retry a download.

Frequently asked questions

Can I choose a precise camera angle or see an image preview before rendering?

No. You choose coverage and timing; Multi-Angle chooses the camera treatment. The plan shows proposed moments, not an image promising the final result. Review the actual generated video after rendering.

Does Multi-Angle replace my audio?

No. The main edit and downloaded video use the original recording’s audio. The individual Generated shot preview is muted by default; use the main player to review with sound.

Can I close the page while it is working?

Keep the page open until upload and preparation finish. Once the saved editor is available, accepted planning and rendering work runs in the background. Return through Projects to check progress.

Does trimming or hiding a shot refund credits?

No. These actions change how the completed result is used, not the render that was already paid for. Trimming before a render also may not reduce the charge below the generator’s minimum duration; always check the price shown.

How do I send feedback or get help?

Use Contact support in the app for help. Include your project link and the error or behavior you saw. After results are available, use Rate this project to leave a rating and optional comment.