
1. How to write an effective prompt
These habits cover most of it. State what the video should cover, give the background Agent Opus cannot guess, hand over your source material or script directly, and keep your request inside what the product is built for.If you get stuck, join our Discord community. We are around to answer questions and connect you with other creators.
2. Pick your mode before you write
Agent Opus has four modes in two families. Standard and Standard+ can turn a written script or transcript into narrated video. Premium and Ultra build scenes with optional dialogue. They can use an uploaded recording as narration or dialogue, but cannot generate a voiceover directly from a supplied transcript. For a full comparison of what each mode includes, see Choosing a mode in the Agent Opus FAQ.3. Standard and Standard+
Narration drives everything here. Agent Opus writes or takes a script, generates the voiceover, and builds visuals to match it. You can also upload a spoken recording. Standard and Standard+ are available on all plans and have no fixed video-duration cap.What it is best for
How to prompt
- Hand over the full script. A complete script beats a description of one. Script length and speaking pace determine the final runtime.
- Name the audience and the tone. Marketing professionals and curious teenagers get different scripts from the same topic.
- Paste your sources. Paste the article text, transcript or notes you want the facts drawn from. Links may not import and paywalled pages cannot be read, so paste the text itself.
- Pick the voice. Open Audio in the composer to choose a built-in voice, clone your own or upload a spoken recording. You can also change it at the Script stage.
- Leave shot-by-shot direction out. Describe the story and the feel. The optional storyboard stage is where you shape individual shots.
4. Premium and Ultra
These modes build a sequence of shots, with lip-synced character dialogue when needed. Describe scenes and actions; dialogue is optional. Available on Pro and Max. Videos run up to 3 minutes, or up to 10 minutes with Song to video.What it is best for
How to prompt
- Describe what happens. Write the actions and visual details for each beat. Include the lines characters speak if the scene needs dialogue. Silent scenes and music videos do not need spoken lines.
- Add references for anything recurring. Upload images of characters, objects and logos that appear more than once. Consistency across shots depends on them.
- Review the script before clips generate. The script sets scene order, timing and speech. Fixing the story there is far cheaper than fixing it after the clips are made.
- Keep it within 3 minutes. Premium and Ultra cap at 3 minutes. Shorten longer stories, or use Standard or Standard+ for a longer narrated video. Song to video is the exception and runs up to 10 minutes.
- Upload recorded speech for narration or a specific voice. Premium and Ultra can use a spoken recording as off-screen narration or character dialogue. Unlike Standard and Standard+, they cannot generate a voiceover directly from a supplied transcript. Built-in voice selection and voice cloning are not available.
- For music videos, describe the performer and the look. The track sets the pacing, so you do not need to time scenes to the lyrics.
5. Referencing your own assets
Your own images, audio and references make a video feel like yours. Agent Opus redraws uploaded images, including logos, in the chosen style. Uploads guide the result but do not guarantee exact reproduction. Check likeness, lettering, colors and fine details in the generated video.What you can bring in
- Images. Product photos, screenshots, headshots and logos. Upload up to eight in Assets.
- Spoken audio. Upload a recording through Audio in the composer or Audio to video. In Premium and Ultra, it can serve as narration or character dialogue.
- Music. A song, through Song to video.
- Reference video. A video file or public link, through Reference to video, to match its style.
- Articles and documents. Paste the text into your prompt. Links may not import, and PDFs or Docs are not accepted as files.
Upload first
Open Assets in the composer and add each image as a character, logo or object, up to eight in total. Supported formats are PNG, JPG, WebP, GIF, SVG, HEIC/HEIF, TIFF and AVIF.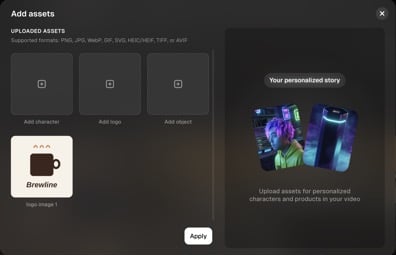
Reference them clearly
Type @ in your prompt and pick the asset from the dropdown. It drops in as a tag linked to that image. Naming a file in plain text does not link it.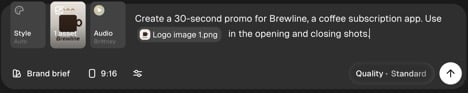
Describe the job, not just the file
Say what the asset is and what you want it to do.- Better: Show @Character image 1.png placing @Object image 1.png on a desk. End on @Logo image 1.png.
- Worse: Use my images somewhere.
6. Why the AI sometimes gets details wrong
The video models are powerful, but not perfect. You will sometimes see odd artifacts, physical impossibilities or details that morph mid-shot.Why it happens
The model has no real understanding of physics, anatomy or logic. It generates video by predicting patterns from the images and clips it was trained on. Video is harder than a still image because the model has to hold characters, objects and backgrounds steady frame after frame. It is calculating probabilities rather than simulating the real world, so it loses track of complex structures as a shot goes on.What you will see
- Anatomical errors. Hands and fingers are the usual culprits: extra digits, missing ones, limbs bending the wrong way.
- Physics and space. Characters walking through walls, objects floating, liquids running upward, items changing size.
- Morphing and flickering. Clothing changes color, faces shift, background objects appear or vanish.
- Object interactions. Holding a cup, typing, playing an instrument. Hand and object often blend together.
- Text and logos within generated footage. Lettering, signage and logos can become distorted or unreadable. This risk also applies to uploaded logos when they are regenerated.
- Reflections and shadows. Mirrors and water reflect the wrong thing, and shadows fall in the wrong direction.
The models behind Agent Opus come from specialist third-party vendors. We do not train them in-house, so their limitations are ours too.
7. Editing your video
In every mode, editing generates new footage for the affected part and blends it back into the video. The final video may be reassembled with the regenerated footage. An edited shot is subject to the same model limitations as the original. Review the edit estimate before proceeding.Standard and Standard+
- Acknowledge the warning. Before your first edit in each project, acknowledge that AI editing is experimental and may contain errors or miss your request. Each video includes one free retry.
- Select the moment. Open the finished video and click the change box. Use Screenshot to point at a moment, or Timestamp to pick a point on the timeline, then drag either end to set the range.
- Describe the change. Name the object or area and what should happen to it. Change the sky to a sunset. Give the character a red jacket. Attach a reference image with + if it helps.
- Review the cost before generating. Paid edit previews use credits when they are generated, before you apply them. The included free retry is the exception.
- Review the result. Generated edits remain visible even when they do not match your request. Compare the preview with the original and apply it if you want to keep it. Discarding a paid preview does not reverse the charge; edit-quality failures are not refunded.
- Use the free retry if needed. If the result is flagged as not matching your request, choose Try again, free to retry or Leave it to stop. There is one free retry per video, with no expiry. Once used, further attempts use credits.
Premium and Ultra
- Edit through project chat. Open the finished video and select Edit, or type the request in chat. Name the scene and describe the result you want, for example: the ending feels abrupt, hold on the finished loaf a little longer.
- Confirm the estimate. Review the proposed change and its cost before confirming. The edit regenerates the affected footage and may rebuild the final video with those updated clips.
- Mind the 30-day window. Premium and Ultra projects can be edited for 30 days. After that the project shows as Expired or Locked and editing is unavailable, though the finished video stays available to watch and download.
Pro tips
- Be specific. Mention lighting, colors and the exact action.
- Change one thing at a time. Rewriting a whole scene in a single edit invites visual inconsistency.
- Expect the same limitations. The editor generates new footage, so morphing and anatomical quirks can appear in an edit too.
8. Content filters and error messages
A content-filter block is different from a generated edit that misses your request. A generation blocked by the AI vendor’s content filter does not cost credits. For a visible Standard or Standard+ edit that misses your request, follow the review and free-retry steps in Editing your video; a quality warning does not block the result or trigger a refund.- Rephrase in neutral language. Describe the scene plainly.
- Rephrase harmless requests that are misread. Terms associated with violence, explicit content, copyrighted figures or hazardous activity can trigger a filter. Describe your intended scene plainly and follow the product’s content rules.
- Stay on the visual. Describe lighting, camera angle and movement rather than abstract concepts.